For anyone out there who wants to be at the summit of a mountain the lazy way but doesn’t want to splurge on some fancy transportation mode (i.e., a gondola lift), check out Mt. Akita-Komagatake (秋田駒ヶ岳) in Akita Prefecture! Although you have to hike a bit longer than Mt. Iwaki in Aomori Prefecture, it only takes a bus trip from JR Tazawako Station (田沢湖駅) to the 8th Station of Mt. Akita Komagatake before you start the 60 to 90 minutes easy hike to the summit!
Table of Contents
- About Akita-Komagatake
- Before You Start Hiking Akita-Komagatake
- A Bus Trip to Mt. Akita-Komagatake’s Trailhead
- From Akita-Komagatake’s 8th Station to the Summit
- A More Stunning but More Difficult Hiking Trail to the Moomin Valley (ムーミン谷)
- Kunimi Onsen (国見温泉)
- Essential/Desired Equipment for Climbing Akita-Komagatake
- Hiking All the Way to Mt. Nyūtō
About Akita-Komagatake
Mt. Akita-Komagatake is a collective name for the active volcanos at the southern tip of Towada-Hachimantai National Park (十和田八幡平国立公園). The mountains here include the Mt. Onamedake (男女岳), the Mt. Odake (男岳), and the Mt. Medake 女岳.
Apart from being known as the highest peak (Mt. Onamedake) at 1,637 meters, it is also the collective peak across Japan that has the most variety of alpine plants (and therefore flowers!).
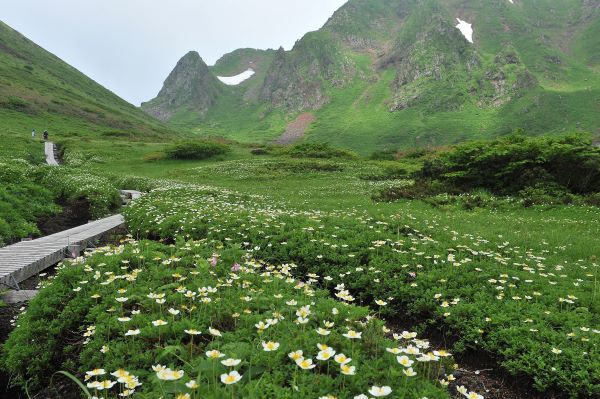
From June to September each year, the mountain becomes lively as the flowers bloom, attracting many enthusiastic hikers! The peak season is July when there is a large colony of dicentra peregrina blossoming!
Important: Mt. Akita-Komagatake is open for hiking from June to October only.
Before You Start Hiking Akita-Komagatake
With the mountain classified as volcanic alert level one, it means hikers would need to be aware that the mountain is an active volcano. Thus, all hikers are kindly asked to submit a notification (登山届) to one of the below locations.
- The closest police station to the trailhead
- Mt. Akita-Komagatake’s tourist information center – Arupakomakusa (アルパこまくさ)
- At the 8th Station of Mt. Akita-Komagatake
Electronic submissions are also available for those who can read and type in Japanese HERE. This is so they have your details and who they should contact if something unfortunate happens.
If you plan to submit your notification at the police station, you can print out their pre-formatted notification HERE (Japanese version only) and fill it in. For those who can’t read/write in Japanese, it will be easier to submit your notification at the information center or the 8th Station, as there will be staff who can assist you.
As a precaution, there are helmets for tourists to use at Arupakomakusa, the 8th Station, and Amida Pond Shelter in case of a volcano eruption.
Important: It is also possible to come across a bear during this trip (the possibility isn’t high, though, as they are likely to hide from us too). According to the guide, who has had multiple bear encounters, if you do see a bear, please do not scream! The safest thing to do is back out slowly without scaring the bear. Do not provoke it either.
A Bus Trip to Mt. Akita-Komagatake’s Trailhead
To start this scenic journey, you have to first reach JR Tazawako Station (田沢湖駅). From there, direct bus services running by Ugoku Kōtsū (羽後交通) will bring you to the trailhead at Mt. Akita-Komagatake’s 8th Station (8合目). For the timetable for the Komagatake Line (駒ヶ岳線), please refer to HERE.
- The services marked with “◎” won’t operate on weekends and public holidays in October.
- The services marked with “★” only operate on weekends and public holidays in October.

As the number of services per day departing from the Tazawako Station is limited, you can also take Ugoku Kotsu’s Nyūtō Line (乳頭線) from JR Tazawako Station (田沢湖駅前) or Lake Tazawa (田沢湖畔) and get off at Arupakomakusa (アルパこまくさ) stop.
Refer to the Japanese version HERE for this service.
From Arupakomakusa (アルパこまくさ), there are a lot more services that are bound for Mt. Akita-Komagatake’s Hachi-aime (Hachi-aime means the 8th Station in Japanese).
Important: If you plan to drive, you will have to change for bus services to get to the 8th Station at Arupakomakusa on weekends and public holidays from June to October and also on weekdays from the 21st of June to the 15th of August due to traffic restrictions.
On your way back from Mt. Akita-Komagatake, you can rejuvenate yourself by using the Arupakomakusa’s onsen facility, which overlooks the beautiful Lake Tazawa.
- The hot spring facility at Arupakomakusa is open from 9 am to 5 pm daily except Thursdays.
- The last admission is at 3:30 pm
- Cost-wise, it is
- 550 yen for adults
- 300 yen for elementary school students
- Free otherwise
From Akita-Komagatake’s 8th Station to the Summit
There are a total of six trailheads that leads to Mt. Akita-Komagatake’s summit. The most popular and easiest one starts from the 8th Station. The altitude of the trailhead is already 1,300 meters, so the elevation difference is minimal throughout the course. The course is generally flat and easy to walk through.
As seen below, from the 8th Station, it takes around three hours for a round-trip journey:
The 8th Station (八合目) → 60 mins → Amida Pond (阿弥陀池) → 10 mins → Amida Pond Shelter (阿弥陀池避難小屋) → 20 mins → Summit: Mt. Onamedake (男女岳) → 35 mins → Mt. Yokodake (横岳) → 15 mins → Shomori (焼森) → 40 → The 8th Station (八合目)
The 8th Station (八合目)
Once you get off the bus at the 8th Station, before heading to the trailhead, utilize the toilet facility here (follow the signboard that says “トイレ”). Then follow the road on the left-hand side of the bus stop to the trailhead.
In between, there is a watering place for you to fill up your water bottle. And if you need to grab some snacks, there is a small shop next to the toilet facility.
Soon after you pass the trailhead, a wooden track will be on your left. Please ignore that track and follow the indicator on the intersection pointing to Amida Pond (阿弥陀池).
Amida Pond (阿弥陀池) and Amida Pond Shelter (阿弥陀池避難小屋)
On the way to Amida Pond, you will enjoy a series of colorful flowers with magnificent scenery as a backdrop.
As you get closer to the Amida Pond, the rocky mountain trail turns into a wooden path. It is recommended that you stay on the wooden path without stepping on any of those precious plants!

When the pond is in front of you, follow the track to the hut on the other side. The two huts there are the Amida Pond Shelter.
When you get to the shelter, you will find the wooden path splits in several directions. The track you want to follow is the one that is kind of parallel to the track you were on (so it will feel like you are going back in the direction you came from, but this time, you are climbing upwards).
Keep following the wooden path; you will be at the summit in 20 minutes!
Tip: The shelter has a toilet facility. When it is cold, come into the shelter to warm up before you start hiking again!
The Spectacular View from the Summit
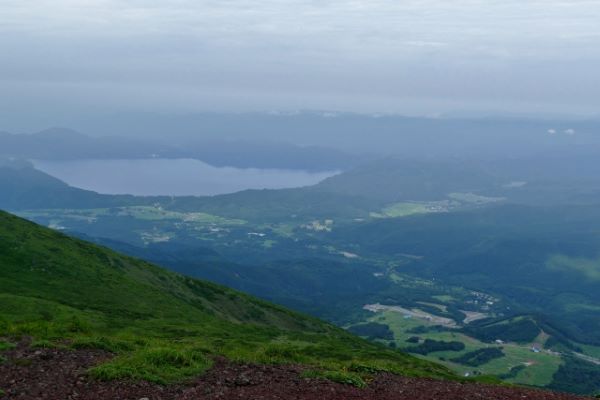
From the top of the mountain, you should be able to undertake a luxurious 360-degree view of the other summits of Akita-Komagatake!
There is also Lake Tazawa in your west direction (*’▽’).
Back to the 8th Station via Mt. Yokodake (横岳) and Shōmori (焼森)
To head to Mt. Yokodake, you will have to get back to Amida Pond Shelter first. Mt. Yokodake is opposite Mt. Onamedake, the summit you have just climbed down from. Just follow the track you are on without diverting into any tracks leading to the left or right. This should bring you to Mt. Yokodake, which then leads to Shōmori, and finally back to the 8th Station.
Tip: At Amida Pond Shelter, look carefully at the stones on the ground next to the wooden tracks. One of them should say “横岳” which means Mt. Yokodake. If you can’t see it, the indicator on the wooden poles around the lake will also point you in the right direction.
A More Stunning but More Difficult Hiking Trail to the Moomin Valley (ムーミン谷)
If you are confident with your physical strength and stamina, you must visit the famous Moomin Valley (if you are thinking of the anime, yes, that is where the valley’s nickname came from!).
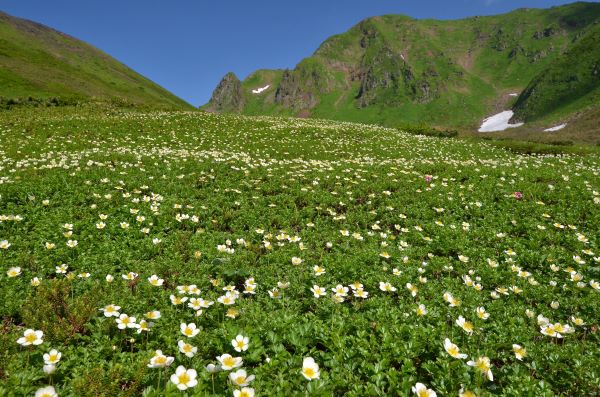
As you walk towards this valley that can also be seen from Mt. Odake’s summit, a huge flower field decorated with geum pentapetalum and viola biflora will unfold before you!
But to get there, you must pass the rocky, unstable steep surface, which is why this trail is only recommended for physically active people.
From the 8th Station, this extended hiking course will take around 5 hours to return to where you started (instead of the 3 hours course above).
Moomin Valley via Mt. Odake
Coming from the 8th Station, instead of heading straight towards Amida Pond Shelter, make a right turn at the first intersection that leads to Mt. Odake. Before you reach the summit of Mt. Odake, the path will split for a trail that leads to Moomin Valley. Since the summit is only a 10-minute climb, let’s head to the summit first!
If you visit Mt. Akta-Komagatake from mid-September to early October, don’t forget to look back down while you make your way to the top. The view is absolutely breathtaking!
After a series of photo and selfie sessions at the summit, let’s go to Moomin Valley!
From Mt. Odake’s summit, the unstable rocky mountain slope starts. As the rocks you will be walking down on might fall or crumble, carefully descend with sufficient space from the leading group.
Once you safely pass the rocky slope, you will land in the Moomin Valley, where Moomintroll and his friends live (´▽`*).
You will then be back on the well-maintained track that is easy to walk on. Crossing the valley, the track will lead you to the summit of Mt. Yokodate. All the way to the top, the flower field of Viola crassa continues!
Please note that there will be a few intersections during this journey. Always follow the indicator that says “横岳 (Mt. Yokodake)”. Once you reach Mt. Yokodake, it is the same route you will follow from the first hiking course to get back to the 8th Station.
On the other hand, if you still would like to climb up to the tallest summit of Mt. Akita-Komagakake, look for the indicators that say “阿弥陀池” to get back to Amida Pond. From there, one of the tracks will lead you to the top of Mt. Onamedake (=゚ω゚)ノ.
To illustrate this whole hiking course, please refer to our simple, hand-drawn map on the right-hand side (´▽`*).

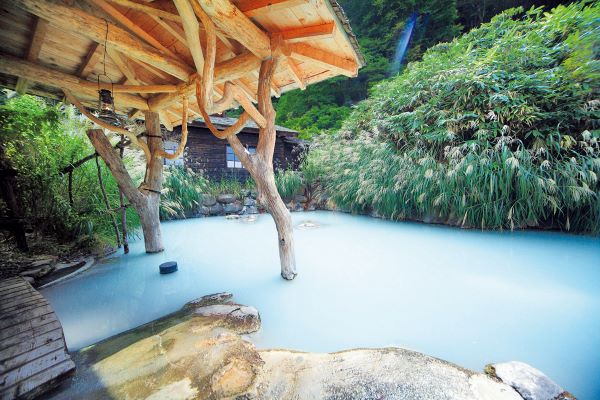
Kunimi Onsen (国見温泉)
Another trailhead of Mt. Akita-Komagatake is Kuunimi Onsen. This course is perfect for those who like mountain tracks with a huge altitude difference. The 11-kilometer course has an altitude difference of around 800 meters. Compared to the two courses mentioned above, which only have an altitude difference of around 300 meters, the difficulty of the Kunimi Onsen course just skyrocketed. Plus, in this course, you have to climb up and down a couple of times, so this journey’s total elevation is around 1,600 meters.
Close to the entrance of the mountain track is Ishizuka Ryokan (石塚旅館). The appearance of this onsen ryokan might not be appealing to you, as it hasn’t gone through many renovations since it opened in the Edo period (1603 – 1867).
Kunimi Onsen is special in its emerald green sulfur spring water (check out the 5th and 6th photos in the Instagram post). It is probably the only place you can find this type of onsen. The spring water is also “thicker” than usual. However, as the onsen contains a lot of iron, if you don’t rinse yourself afterwards or properly, it may leave a black tinge on your skin (´▽`*).
Whether it is the Ishizuka Ryokan or the Mori Sanso (森山荘) that is close by, it will be a lifetime experience if you stay overnight at Kunimi Onsen!
Kunimi Onsen Course (国見温泉コース)
The Kunimi Onsen Course will take around 6 hours to complete. Below are the course’s details.
Kumini Onsen Trailhead (国見温泉登山口) → 70 mins → Yokonagane Bunki (横長根分岐) → 40 mins → Baba no Koji (馬場の小路) – also known as Moomin Valley → 80 mins → Amida Pond (阿弥陀池) →10 mins → Amida Pond Shelter (阿弥陀池避難小屋) → 20 mins → Mt. Onamedake (男女岳) → 35 mins → Mt. Yokodake (横岳) → 110 mins → Kumini Onsen Trailhead (国見温泉登山口)
The best thing about this course is that after passing the initial forest belt, the magnificent mountain views continue throughout the course, accompanied by abundant alpine plants!
After hiking for 1.5 hours to 2 hours, the track will split. If you want to get to the gorgeous Moomin Valley, please head left. If you turn right, you will be skipping a large part of this course to Mt. Yokodake.
How to Get to Kunimi Onsen
There are no bus services available for Kunimi Onsen, so you either have to drive or take a taxi from JR Tazawako Station (田沢湖駅).
As it is a 30 to 40-minute drive, it may cost you a couple of thousands of yen to get there if you decide to take a taxi.
Also, Mt. Moriyoshi is home to Asian Black Bears. Bringing bear bells with you should reduce the chance of a bear encounter!
Essential/Desired Equipment for Climbing Akita-Komagatake
- Hiking boots
- Hiking poles
- Rain gear
- Light to thick jacket depending on the season you visit Mt. Akita-Komagatake (in stormy weather or where there are strong winds, the temperature will be close to 0 degrees, so make sure you pack enough clothes with you)
- Gloves
- Spats
Hiking All the Way to Mt. Nyūtō
If you still have energy, you can hike all the way to the summit of Mt. Nyūtō from Shōyama.
The route is below:
Shōyama (焼森) → 60 mins → Yumoriyama (湯森山) → 60 mins → Kumamidai (熊見平) and then Zarumoriyama (笊森山) → 60 mins → Mt. Nyūtō (乳頭山) → 35 mins → Tashirotai Wetland (田代平湿原) → 60 mins → Nyūtō Onsen (乳頭温泉)
To know more about the onsen resort, refer to our article on Nyūtō Onsen!